

@_RavinderSingh_ The inception of Save Humanity campaign: http://t.co/kNppT5Lwp6 Share with maximum people.! We need to reach more people.
— Akarsh Raker (@aka7jannat) December 16, 2014
Also Read Lenovo K3 Budget Smartphone Launched as Xiaomi Redmi 1S Competitor
@_RavinderSingh_ The inception of Save Humanity campaign: http://t.co/kNppT5Lwp6 Share with maximum people.! We need to reach more people.
— Akarsh Raker (@aka7jannat) December 16, 2014
Nowadays, almost all cell phones have an inbuilt WiFi adapter. And also, Android OS is much popular these days. Thus most of us have an Android phone with latest WiFi technology, may be 802.11 b/g/n. As almost all PC’s today are equipped with a WiFi adapter and almost every computer OS provides the feature of creating a Wireless Connection, one may think of creating one and share the internet connection for use in Android. But it is of no use, as Android is unable to detect “ad-hoc” wireless networks and it needs an “infrastructure network”. Its well enough if you have a wireless router as its somewhat not possible to create an “infrastructure network” using PC’s WiFi.
But, here comes the twist. The line you read just 2 seconds ago is wrong. Yeah, one can create a Wireless Network using PC’s WiFi for use in Android (Under some conditions!). This guide features a complete tutorial on creating a Wireless Connection in Windows (detectable by Android) and sharing your Internet Connection over WiFi.
Before continuing with this tutorial, I recommend you to download mHotspot. Its required for creating an infrastructure network (A Hotspot!). Also, let me assure, that this software works only in Windows 7 and above. Thus, XP users have to find some other solution as we cannot continue without this application. Sorry for that !! So, lets begin.
First of all, we need to share our working Internet Connection with the WiFi adapter. For doing so, proceed as follows.
Open “Network and Sharing Center”. From the left pane, click on “Change adapter settings”.

This will list all your network adapters and connections. Now right-click on your current, working Internet Connection and select “Properties”.

A dialog box will be opened as shown in the image. Go to the sharing tab. Check the option“Allow other network users to connect through this computer’s Internet connection“. If it is already checked, uncheck and check it again. Now, from the dropdown under the label“Home networking connection”, select “Wireless Network Connection 2″ from the list.
Also Read Moto E (Gen 2) With 4.5-Inch Display and 4G LTE Tipped to Launch Soon

In most PC’s its name is “Wireless Network Connection 2″ by default, unless changed. If you can not find it in the list, just search for your “Microsoft Virtual WiFi Miniport Adapter” and select its name from the list. Then, click on “OK”. If prompted about some IP Address settings, just click “OK” and proceed further.
 Now, open Properties of that “Wireless Network Connection 2″ (Microsoft Virtual WiFi Miniport Adapter). Double-click on “Internet Protocol Version 4 (TCP/IPv4)”.
It will open up another Properties window. Here, select the option “Use the following IP adress”. Set the “IP address” to 192.168.0.1, the “Subnet mask” to 255.255.255.0 and leave the “Default gateway” blank. Also, set 8.8.8.8 as the “Preferred DNS server”. Leave“Alternate DNS server”, blank. Click “OK” and also close other Properties window. Thus, we have shared our Internet connection. Then, connect to the Internet connection.

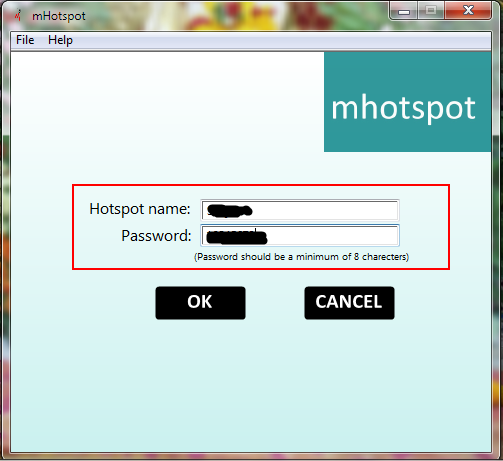
Now, we proceed towards creating a WiFi hotspot. For that double-click on “mHotspot.exe” that we downloaded a the beginning of this tutorial. Then, click on “SETUP HOTSPOT”.

Give the desired name and a password (minimum 8 characters). Make sure you provide a strong password (I recommend that the password should contain alphanumeric characters with atleast one uppercase letter and one special character like for example: “Ggsr@143″). After that, click on“OK”.
Also Read Motorola India Claims to Have Sold 2.5 Million Smartphones This Year
Now click on the “START” button.

Now, click on the network icon in the taskbar and check whether the name of the newly created WiFi hotspot appears or not. If the name is listed, means we have successfully configured our hotspot.

It will show “Internet access” under the name of your current Internet connection and also under the name of our recently created WiFi hotspot. If “No internet access” is mentioned under the name of your current Internet connection, means you are not yet connected to the internet. While, if“Internet access” is mentioned under your current connection but “No internet access” is mentioned under the name of the hotspot, means the Internet connection is not properly shared. Just repeat the previous steps for sharing the Internet connection properly. If all set, then its time to configure the Android device.
Below here, I have mentioned steps for the Android device running Android v2.3.6 (Gingerbread). Though, the steps are somewhat similar for other versions. So, just go toSettings -> Wireless and networks -> Wi-Fi settings. Now open menu and select“Advanced” option.

Here, check the option “Use static IP”. Set the “IP address” to 192.168.0.2, “Gateway” to192.168.0.1, “Netmask” to 255.255.255.0 and “DNS1″ to 8.8.8.8 and leave “DNS2″ blank. Now save the settings and turn the Wi-Fi on.

It will detect and display the name of our hotspot in the available networks list. Select the network, enter the password and tap on Connect. If you are authenticated correctly, your cell phone will be connected to the hotspot.

It will detect and display the name of our hotspot in the available networks list. Select the network, enter the password and tap on Connect. If you are authenticated correctly, your cell phone will be connected to the hotspot.

That’s it. You can now use the Internet on your device.

I have basically shown the steps for Android but, these can be done the same way in other devices. One just needs to know how to configure the IP settings in that device. This hotspot is detectable in almost every WiFi enabled device. Thus it can be used to share an Internet connection between PC’s too.
Happy and Safe Browsing !!
Also Read Google India's Great Online Shopping Festival (GOSF) Kicks Off Wednesday
NOTE: Feel Free To Comment....


0 comments: